


Decal Application Guide
Here is a handy guide for installing our case decals, which are among the simplest yet most visually striking case mods you can apply to your PC.
This guide is for an external case vinyl, applied to the outside of a side panel, but the process for applying a reversed "etch effect" case decal to the inside of a window panel is exaclty the same, albeit flipped around.
1. First of all, you want to carefully prepare the area you wish to apply your vinyl decals to. It must be clean, dry and free of dust/polish etc.
There is nothing worse than having to peel back up a vinyl sticker to try and remove a bubble caused by a single grain of dust or hair! If you're using a polish, be sure and let it dry fully after you've wiped it away. The polish can prevent the case vinyl from adhereing to the side panel properly ( or can make it slide and mess up your careful positioning )

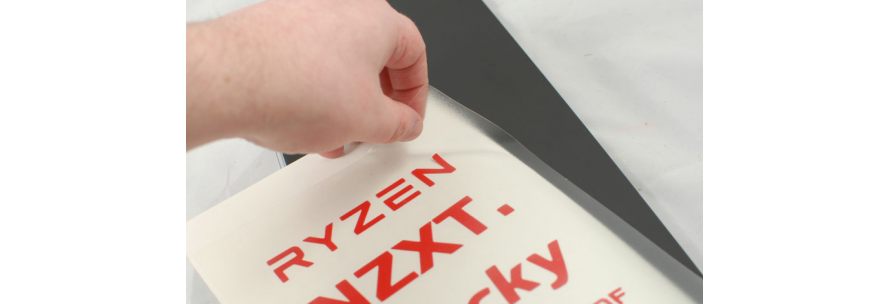
2. To remove the backing paper lay your decal down on a solid surface and peel the application tape off slowly, keeping it as close to the decal as possible as you go.

Typically, as in the picture above which shows one of our manufacturer logo stacks, it's best to peel this at such an angle that you work from a smaller edge rather than a wide flat. That is, peeling this diagonally often means that you're lifting less material at once, and so it's easier to manage.
Make sure all of the vinyl stays stuck to the application tape. If a piece of the design won't lift off the backing paper, press/rub the affected area with your finger or a squeegee (a bank card or shop loyalty card is perfect for this) to ensure it sticks to the application tape.
3. Without applying the decal to the panel, hold it above the desired location and check that everything lines up - for instance with text, ensuring it's flat level to match the panel, you may find if not applying near the edge, that having a ruler to give you a straight edge as a near reference is handy.
At this stage it may be useful to have someone to hand to stand back and check it is correctly aligned.
Carefully place one edge of your decal onto the surface it is to be applied to, and then gradually roll it down. Don't try and directly place it one go as this can create bubbles. Ideally squeeze it in place with a card as you roll it on, or just use your thumbs.
Note / Pro Tip - If the case decal is large, a good trick is to place the backing paper back over the actual vinyl, but leave some application tape uncovered. You can do this by either rotating the backing paper 45 degrees, or by cutting the backing paper to shape with scissors. This will allow you to line up the design where you want it without the actual vinyl sticking to the side panel.

4. Once applied and with the clear application tape still in place, use a squeegee/credit card rub over the entire decal to ensure it is stuck down and any bubbles or edges are pushed out.
5. Peel the application tape back slowly at an angle of about 45 degrees. By pulling the tape over the squeegee card, it presses the vinyl onto the case while pulling the application tape away. Go slowly. If you judder and jerk too much, it'll leave crease marks behind on the vinyl.

Check that no parts of the decal lift off at this stage. Pay special attention to the smaller details of the design, for instance, the tittle above lower case I or J or a TM mark. If they stay on the application tape, simply lay it back down and squeegee them harder than you did before. The tape is quite resiliant, give it some elbow grease!
6. Stand back and admire the completion of the easiest and most effective compter case mods availiable! 
That window looks a little bare now, it could do with an etch effect decal... Next step, order more vinyl decals!
Remember as well that we can produce custom designs from your own artwork.


